Sleet Island
Back to Legend of Grimrock 2
Sleet Island lies to the north of the Forgotten River and is where you can find the Shrine of Water. When you enter the area you’ll spot the Island Master placing a Letter and Island Map in a tree hollow.
Around the island you’ll find some nasty monsters including the Ice Guardian, Medusa, Mosquito Swarms, Summon Stones and Zarchtons. There’s 5 secrets and 1 hidden treasure.
River Tunnels Map
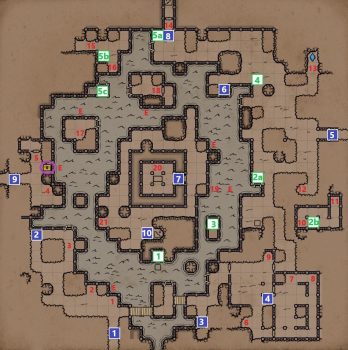
River Tunnels Walkthrough
1: Path to Forgotten River
2: Throw any item across to the demon’s head to “wake it up” and a bridge will appear leading across the water to the north.
3: The Arquebus is on a pedestal. When you pick it up you’ll be teleported to a room in the Flooded Dungeon full of Mummies. Kill them and then go through the Windgate to come back to this area.
4: Mind and Matter puzzle. There are 2 Philosopher’s Stones that you need to push onto the orange tiles. Push both stones west, push the button and get out of the way of the spark so it can enter the receptacle. Push the other stone east through the grate. Then push the button one tile north of the southeast corner. Now you can push the second stone from the north onto the second orange tile.
5: Path to the Cemetery
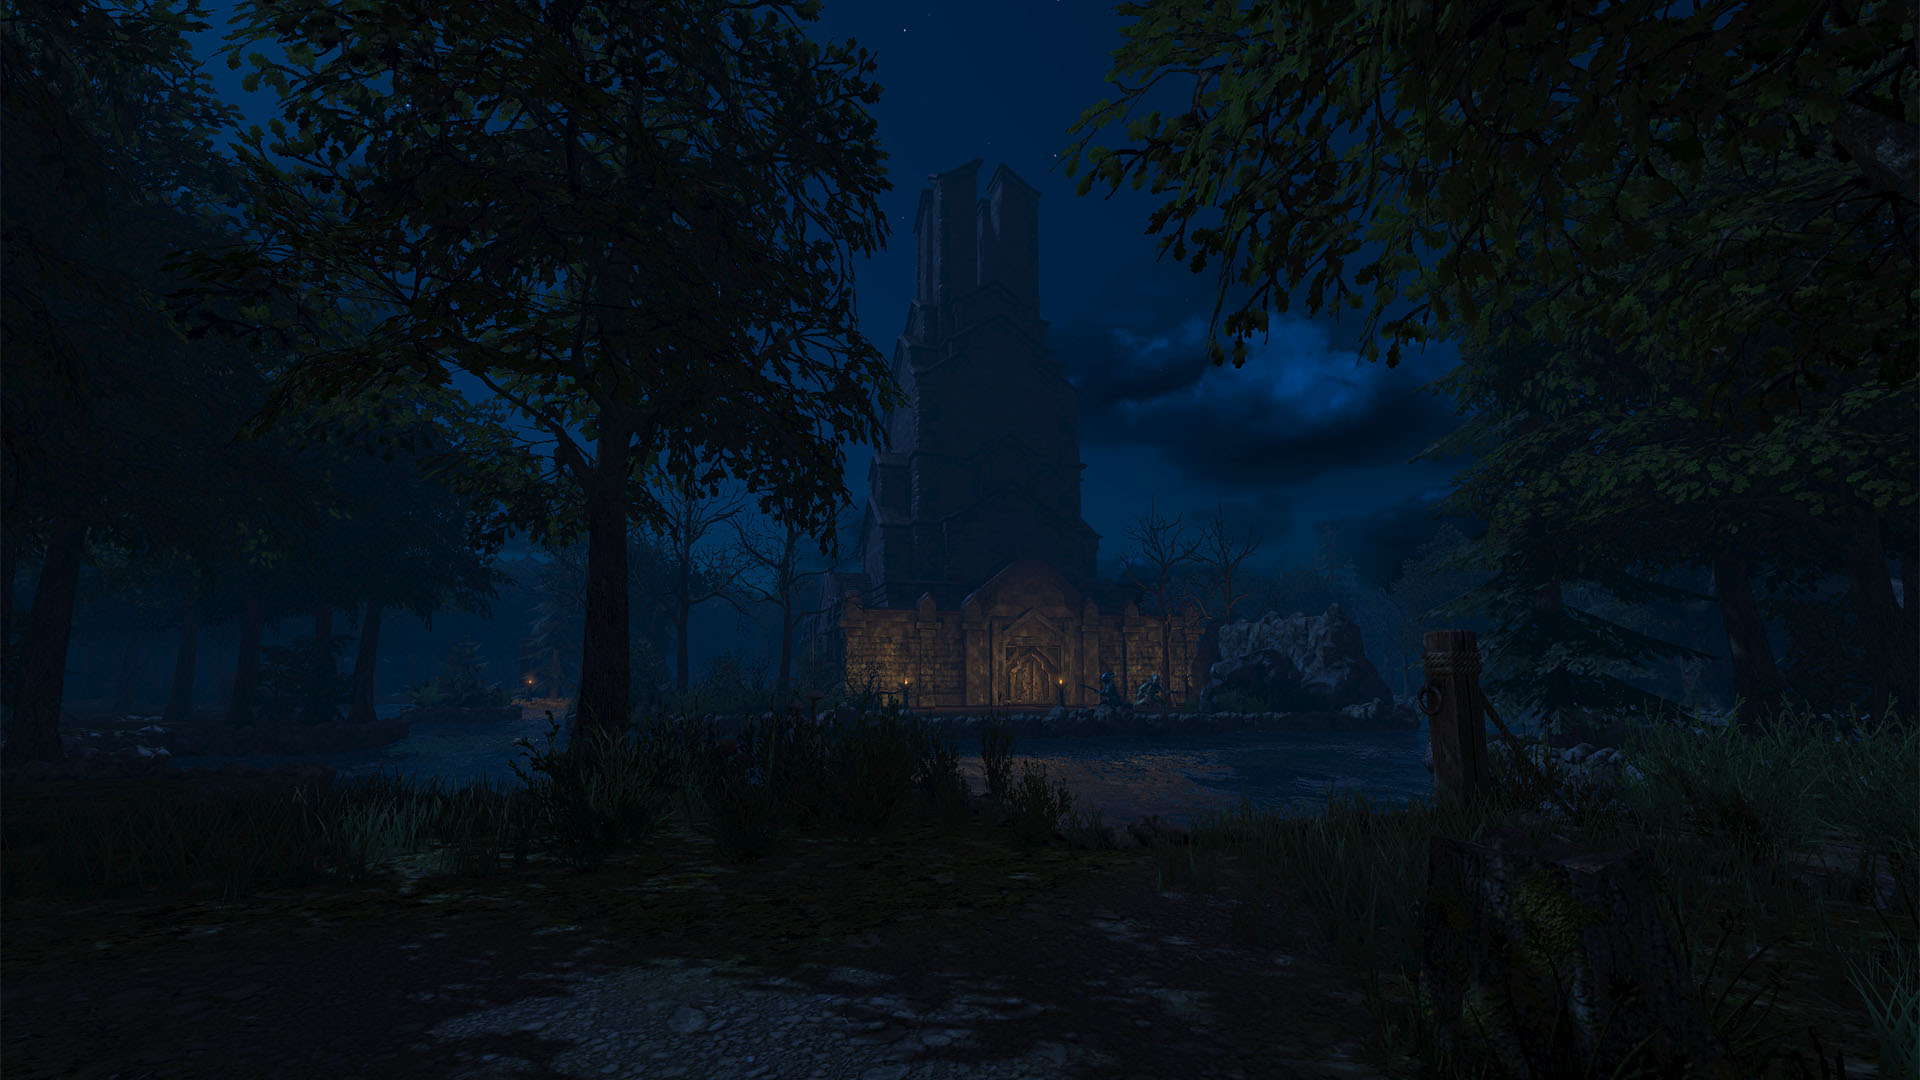
6: The shrine is surrounded by water and seems impossible to reach. You’ll get a clue in the cemetery to stand in front of the silent one at night and watch to the south. Wait in this location and eventually you’ll spot the Trickster making a bridge across the water. Use the bridge to cross over into the shrine. Place 4 Power Gems to make the Essence of Water but watch out for the 4 Ice Guardians that appear afterwards.
7: Shrine of Water
8: Path to the Pyramid of Umas. You must have the Serpent Staff to open this door.
9: Path to the Ruins of Desarune
10: Stairs down to Flooded Dungeon
Secrets
1: The sign says “Hold your breath”. Do exactly as it says. Wait on the pressure plate until the gate opens. Inside you’ll find a Skull and Antidote.
2: Stand on the pressure plate south of 2a and Mosquito Swarms will be teleported in. Kill them and then stand at 2a and throw an item on the pressure plate. You’ll be teleported to 2b.
3: One you teleport into the previous room step left and forwards before the Windgates disappear. You’ll be teleported to a small island where you can find the Stormseed Orb.
4: The Stone Philosophers who identify as the right and left eyes are looking in certain directions. Their gazes will cross at the location of secret 4. Dig up this tile to find a Meteorite.
5: Press the hidden button (5a) on the wall of the pyramid to reveal a magic bridge to the west. Walk over it and then press the next button on the ruined wall (5b). This deactives the bridge to the south so you can drop into the water to find a wooden box with a Mirror Cuisse, Pellets and the Runestone Necklace.
Buried Treasure
You’ll find a map in the Tomb Underground, which is under the Pyramid of Umas to the north. It marks a spot just east of the entrance to the Ruins of Desarune. The spot is between a tree and a rock with a tall building (the shrine) seen across the water. Inside the chest you’ll find a Shield Potion and Zarchton Harpoon.
List of Items
1: Rock
2: Letter, Island Map
3: Rock
4: Etherweed
5: Horned Fruit
6: Leather Cap
7: Lock Picks
8: Recipe: Rage Potion, Horned Fruit
9: Blooddrop Cap
10: Skull
11: Lockpick, Pellets, Scroll of Shock Shield
12: Rage Potion, Pitroot Bread
13: Recipe: Antivenom & Antidote
14: Letter
15: Crystal Flower
16: Blooddrop Cap
17: Tribal Shield, Note
18: Blooddrop Cap
19: Embalmer’s Pants
20: Scroll of Frost Shield
E: Etherweed
Next: Flooded Dungeon or Keelbreach Bog
Back: Forgotten River