Orul’s Crypt
Back to Legend of Grimrock 2
Orul’s Crypt consists of a main chamber connected by teleporters to a Laboratory, Mausoleum and Sanctuary. In each of these areas you’ll find a key to use in the main chamber. Once you have all three keys you’ll open the gate to the Power Gem.
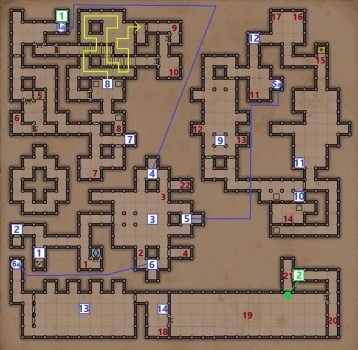
Orul’s Crypt Map
Orul’s Crypt Walkthrough
1: Stairs up to the Wormbound Catacombs.
2: Teleporter to the surface (Cemetery).
3: Main Chamber. Find the 3 Skull Keys in the side areas and use them to unlock the gate to the Power Gem.
4: Teleporter to the Sanctuary.
5: Teleporter to the Mausoleum.
6: Teleporter to the Laboratory.
7: Step through the teleporter and read the Note. Put an item through the teleporter and it will land on a pressure plate, opening the door to the north.
8: Void of Light. You’ll need to turn off all glowing platforms to reach the door. From the center pressure plate follow the yellow path shown in the map above (N W N N E N W N N E E E S W S S S E S E N N W N E N).
9: The Trickster. When the Trickster steps off the pressure plate the side walls will open, releasing Skeleton Warriors. After the battle place something on the pressure plate so you can continue.
10: Drop an item onto the plate below. When the windgate deactivates stand on the plate two tiles to the west and throw an item south so that it lands on the southern pressure plate. The gate to the east will open. Feel free to drop down and pick up any items that have fallen to the floor.
11: Spark Puzzle. Press the Button and make your way through the hallway without hitting any of the sparks or the force field will be activated.
12: Pull the Lever to open the passage to the south leading back to the start of this area.
13: Who Am I? For this puzzle you need to pull the chain on the wall next to the alcove with the item that is different from all the rest. If you get it wrong some of the creatures will be released. You may want to kill the enemies for experience. The correct answers are Wood, Potion, Helmet, Hat, Tortoise, Wyvern.
14: Follow the Light. Turn off the torches and you’ll notice a light on the safe tiles. Follow the light across the pit to make it safely to the other side. Press the Button on the north wall to activate a secret above.
Secrets
1: Press the Button on the east wall to open the wall to the north where you’ll find a Scythe.
2: Press the Button in the spike pit to open the room above where you’ll find Lock Picks, Fire Torc and Fire Blade.
List of Items
1: Shield Potion
2: Blackmoss
3: Blackmoss
4: Brace of Fortitude, Potion of Willpower
5: Scroll of Fire Shield, Greater Energy Potion
6: Rage Potion
7: Note, Horned Fruit
8: Great Axe
9: Skull Key
10: Etherweed, Falconskyre, Blooddrop Cap x3
11: Falconskyre
12: Blooddrop Cap
13: Lightning Bomb x2
14: Crossbow Quarrel x3
15: Diviner’s Cloak, Horned Fruit, Bread
16: Knuckles of Steel
17: Skull Key
18: Letter
19: Cheese, Pellets x10, Crossbow Quarrel, Lightning Bomb
20: Skull Key
21: Lock Picks, Fire Torc, Fireblade
22: Power Gem
Next: Crystal Mine Entrance
Back: Wormbound Catacombs