Level 3: Aztec
Back to Final Doom
Aztec
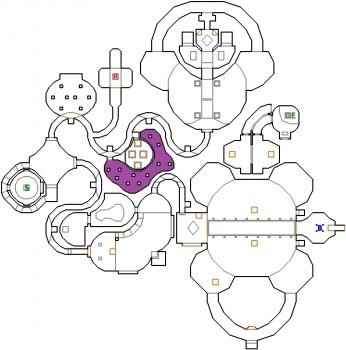
From the Start dash across the gap and head down the stairs to the right. You’ll reach a small hub area. The passage to the north leads to the Red Key and the passage to the east leads to the Blue Key.
Head to the north first and you’ll drop down into a room with a Mancubus. Take it out and continue down the passage. Take the first left and you’ll see the Red Key. When you approach it enemies will spawn in, including an Arch Vile. Take them out and then pick up the key.
Make your way back to the hub and take the east passage. When you get to the large room an Arch Vile will ride up a lift in front of you. Take it out and continue up the stairs to the left.
When you get to the top of the stairs continue down another set of stairs to a large room. Quickly run across the invisible bridge, taking out as many Chaingunners as you can along the way.
Take the small lift up so you can get high enough to grab the Blue Key. Quickly run back across the bridge and go through the teleporter. You’ll be taken to the southwest platform with an Arachnotron. Head back through the passage to the south and press the Face Button. Watch out for the two Chaingunners who appear behind you.
Clear out all the enemies if you wish and then go back to the starting hub. Head along the passage to the north and continue past the passage with the Red Key. Press on the wall opposite the next torch and it will open into Secret 1. Kill the Chaingunners and Revenant and grab the Soul Sphere.
Continue along the passage and clear out the Chaingunners on the platforms in the next bridge. As you walk into the next building two Pain Elementals will be released.
Go through the Red Teleporter and press the Button. Watch out for the Revenant on the other side of the low wall. Now go back through the teleporter and step on the Blue Teleporter. Press the Button to lower the Exit and go through to complete the level.
Back: Level 2: Well of Souls Next: Level 4: Caged